TABLE OF CONTENTS
- 1. Perform the Daily Maintenance for your machine.
- 2. Change the filters.
- 3. Perform the Daily burn off.
- 4. Drain the oil.
- 5. Inspect the intake and exhaust.
- 6. Filtration / Exhaust fans are not working efficiently.
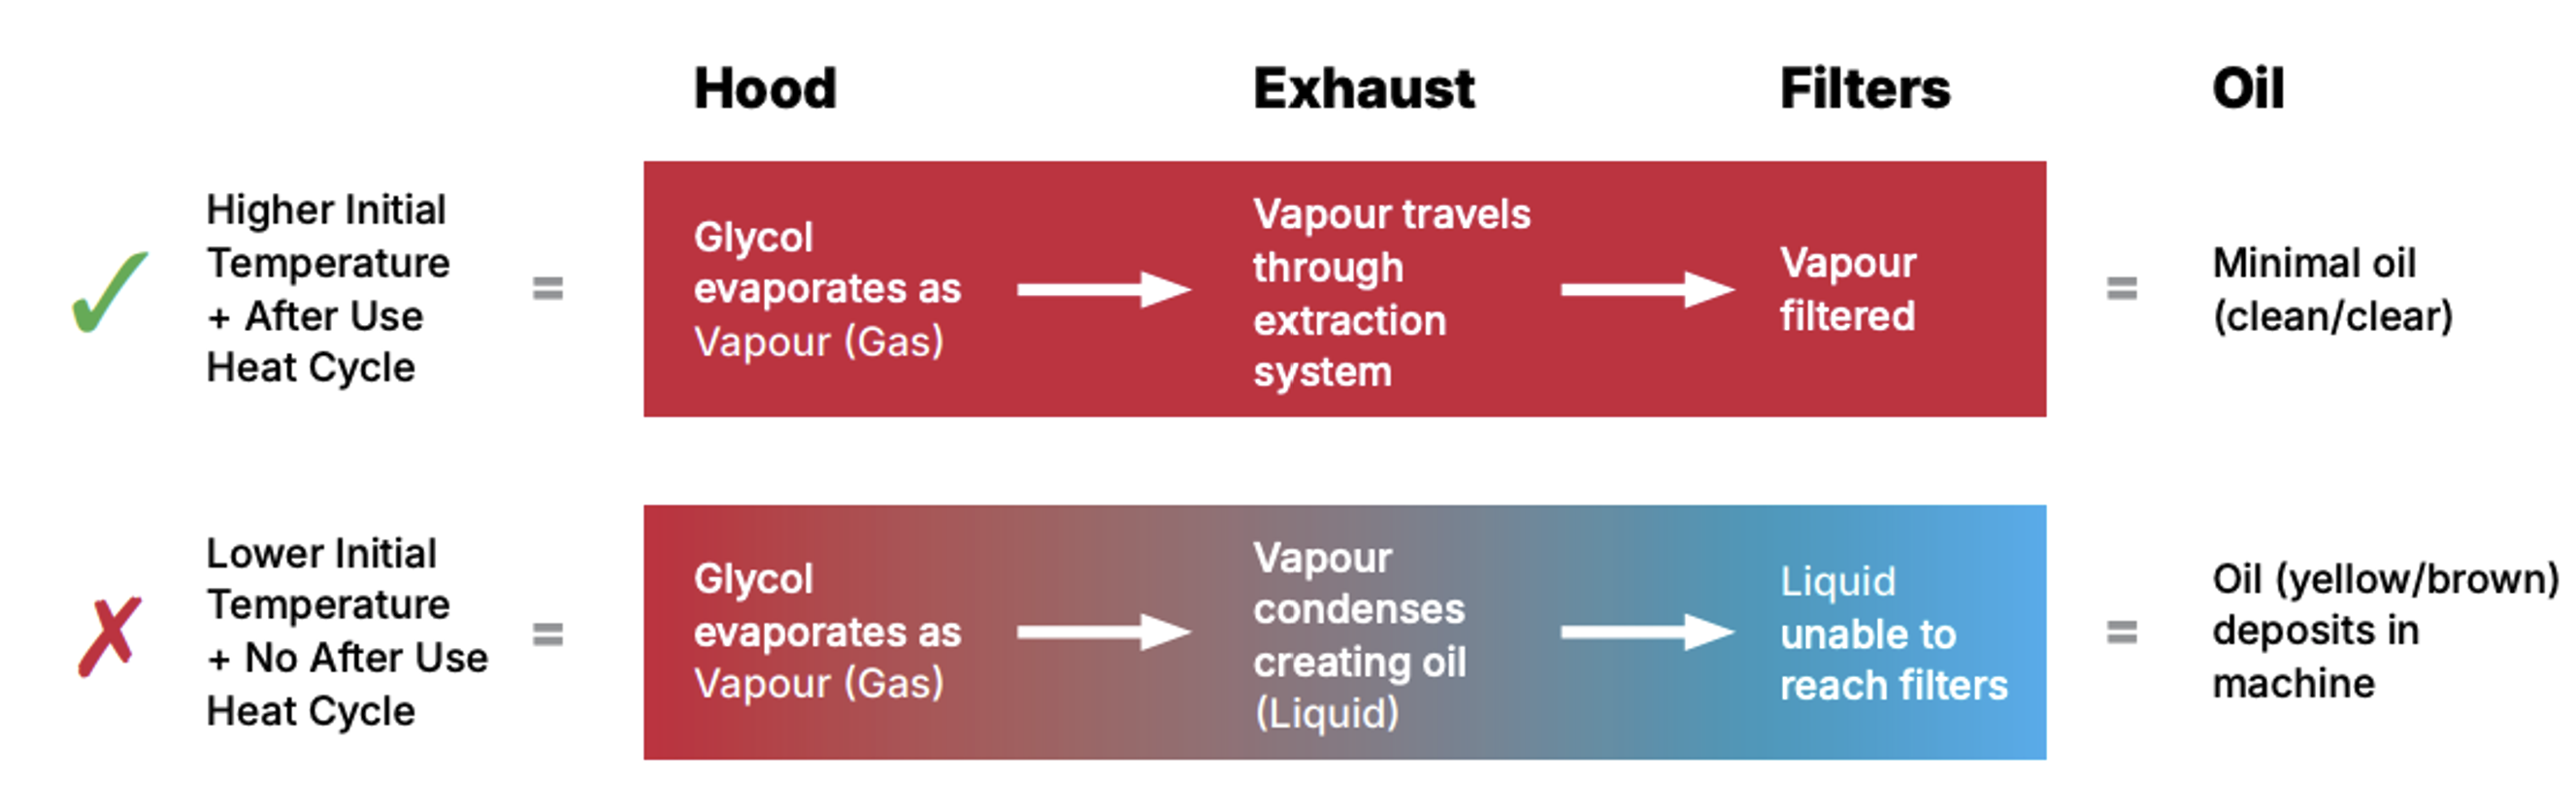
Glycol and oil is a by-product of the DTF process, however this can be limited if the machine is operated and maintained effectively.
You can read about the importance of DTF machine maintenance and filter replacement here.
If your Adkins DTF is showing a build up of glycol and oil within the machine, you may need to follow the maintenance steps below to resolve the issue.
1. Perform the Daily Maintenance for your machine
You should perform Daily Maintenance at the end of each day that the machine has been used. Poor maintenance can cause a build up of Glycol and lead to more serious problems like excess smoke appearing as the filters and internal pathways can become blocked.
You can find the maintenance guidelines, including the Daily Maintenance for your machine, in your User Manual or the Adkins YouTube channel.
Inline 800 Maintenance:
Compact 600 Maintenance:
Inline 900 Pro Maintenance:
Coming soon.
2. Change the filters
Your filters should be changed immediately if you have smoke coming from the filter box.
For general maintenance you should replace the medical grade filters following the below intervals:
- Every 1.5 months for high usage
- Every 3 months for low usage
For guidance replacing the filters, please see the above videos or refer to your User Manual.
3. Perform the Daily burn off
To prevent a build up of Glycol and oil, you should perorm a daily 'burn off' as part of your maintenance schedule.
Set Main heat temp to 120°C for a minimum of 15 minutes and activate the HEAT function.
(Inline 800 / 900 Pro - activate FEED function to keep the belt moving.)

Once the burn off is complete, set the Main heat temp back to the original value.
Do not leave the machine unattended.
4. Drain the oil
Locate the drain tap underneath the machine. Open the drain tap to drain the collected oil into your drip tray.
The oil should be clear and water-like.
If you are concerned with the colour or viscosity of the waste oil coming from your machine, and have already performed the maintenance above, please contact your dealer.
5. Inspect the intake and exhaust
Before inspecting intake and exhaust points, make sure the machine has been allowed to cool and extract any vapour from previous printing/curing.
Take care when cleaning metal components, some edges may be sharp.
All models
Open the lid and locate the square aperture towards the front left of the machine. This is the extraction intake. Make sure both upper and lower apertures are kept clean and any oil or residue is cleaned regularly and thoroughly.

Inline 800
Open the side door and locate the extraction exhaust pipe. Clean the inside and outside thoroughly.
Version 1.0
The machine side outlets (circled in red) should be cleaned thoroughly. The Door

Compact 600/900
Remove the left side cover and locate the filter/extraction box. Remove the 2x screws (circled in red) holding the extraction outlet cover in place as shown. Thoroughly clean the inside of the box.

Inline 900 Pro
Open the left side access doors to expose the cooling fans and filter box. Remove the outer screws (circled in green) to move the cooling fan panel so you can access the extraction box.

Remove the screws (circled in green) to remove the pre-filter extraction fan and inspect the extraction chamber. Remove the screw (circled in red) to inspect the post-filter fan and extraction chamber. Thoroughly clean the extraction box where possible.

6. Filtration / Exhaust fans are not working efficiently
Your machine may begin to show a build up of glycol and oil if the vapour is not being extracted correctly. This may be due to a faulty extraction or filtration fan. To check that the fans are working as they should, activate 'Heat' and 'Feed' and wait for the machine to reach the set temperature (you may wish to reduce the set temperature so the test can be performed quicker). When the temperature reaches the set temperature, the extraction fans should activate.
Inline 800
Open the extraction door on your Inline 800 and look at the inner side of the extraction door. Remove the screws (circled in green) to expose the extraction fans. Locate the fans (shown in red) and check to see if each individual fan is working correctly.

Compact 600 / 900
Remove the left side cover to expose the extraction/filter box. There are 2 fans that you should check to make sure the extraction system is working efficiently. The post-filter extraction fan shown in red/blue and the pre-filter extraction fan shown in red/yellow. You should also look to clean the outlets shown in red

Inline 900 pro
Open the left side access doors to expose the cooling fans and filter box. The post-filter fan (shown in red) can be seen inside the small chamber on the right. Remove the outer screws (circled in green) to move the cooling fan panel so you can access the extraction box.

Along the left you can see the extraction fans staggered on top of the extraction box. Each of these should be working and can be checked individually.

Was this article helpful?
That’s Great!
Thank you for your feedback
Sorry! We couldn't be helpful
Thank you for your feedback
Feedback sent
We appreciate your effort and will try to fix the article